
Hello dear people! It's been quite a while since I wrote anyting here, although I have been playing and painting a decent amount. You know how it is during the summer time... blogging slows down a bit and I even missed covering the last Infinity releases! I have also been moving house which have delayed my blogging even more.
I have a bunch of articles in the pipeline though, covering things like the upcoming Dust Warfare/Tactics releases from Battlefront as well as first impressions and session report of Torchbearer and Dungeon World. I've been painting some of my Descent minis as well so expect to see them here in the near future.
However, today is all about the glorious heavy armour of the Sino-Soviet Union! Almost a year ago I painted my first Dust Warfare models - the KV-47 medium walker and since then I have also painted a bit of infantry to an acceptable gaming standard. But even though I got my hands on the KV-3 heavy walker and the IS-48 super heavy tank quite some time ago they have been sitting unpainted! Until now. Before sitting down to paint though I did what I always do as soon as I get the opportunity: I put some magnets in the pintle mounted machine guns so they are easily detachable.

Might mount an antenna on it later.
I was really happy when Campaign Book Hades was released and the SSU finally got some long range firepower. I had been terrorized by Anders' Wotan with its powerful laser kannone and now it was time for payback! The KV-3 K Matrioshka mounts two 152mm ML-20S guns and rolls the most dice against armour in the game (currently). It has long range and can take a beating as well so a perfect addition to my very infantry who are very much inclined to close quarter combat.

Love the profile on this guy!

If you look close enough you might be able to see the colour shift between
the hull and the barrels and magazines.

The Babushka...
The KV-3 M Babushka switches the two large cannons for two Maxim Gatling guns that are very effective against all kinds of infantry and even light-medium vehicles. But while the Matrioshka fills a great gap in the SSU lines the Babushka, while decent, doesn't really offer all that much that the cheaper Natasha can't do better. Sure, 36" range instead of 24" is nice but Natashas ability to split fire and automatically suppress two squads as well as denying the enemy the benefits of cover I feel is more important. It's not too expensive though at a mere 50AP so I'm sure I'll give it a try some day. Had the Babushka been able to fire on aircraft I would have jumped with joy though! At least it looks really badass. :)

In smaller games I could see how the Babushka might excell though.

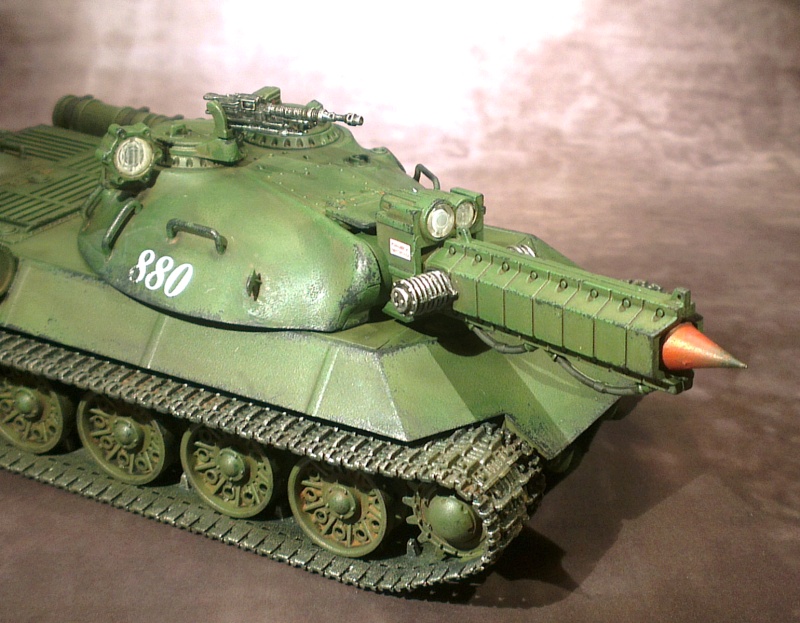
The Lavrentiy Beria.
Of the two tank designs released for the SSU so far I've only got the super heavy IS-48 version. First there's the Lavrentiy Beria that is armed with the same 152mm cannon as the Matrioshka - except there's only one of them meaning the Beria rolls a couple of dice less. It has also two turret mounted DShK machine guns and a front mounted ATO-45 flamethrower. All this packaged in a sturdy Armour 7 package, meaning it'll stay on the field for most of the game. It's a solid tank, but I find it hard taking it over the Matrioshka if it's anti-tank firepower I'm looking for. Sure, the Beria will take more of a beating, but it doesn't dish out quite as much damage and it's 20 more points. Probably the best looking tank so far though and I will use it for that reason alone.

I was a little bit worried that drybrushing something so flat such as the IS-48 wouldn't really work, but in the end it came out looking just fine. As long as you don't load to much paint on your brush.

It looks a bit empty from the back. Might see if I could add some stowage etc in the future.
And an antenna.

The Karl Marx.
The other IS-48 design is the Karl Marx. Instead of the 152mm cannon it has a heavy Tesla cannon, which is the SSU trademark "super weapon". Except... it's really not all that super. It kills infantry reasonably well (although, again, probably not as well as the humble Natasha) and can damage vehicles with a lucky hit. It also has the ability to jump and hit another nearby target, but to do this you have to give up the re-rolls you get during a sustained attack and it simply doesn't seem worth it. Interestingly, Alex Davy (who was responsible for Dust Warfare when it was still at FFG) said in a recent post that one of the things they would have FAQed, given a chance, would have been to make the Tesla gun jump during any attack, not just sustained attacks. A small change but something that would have brought the Tesla gun in line with Phasers and Laser cannons. I still haven't used the Karl Marx in a game, but I'm sure I'll give it a try for the novelty of it sooner or later.
The mighty (hah!) Tesla cannon!
Just like the KV-47s last year these were actually quite simple to paint. There's no fancy camouflage to think about or differently coloured parts, it's just... green. Glorious green!
For those who might want to try something similar, here's what I did:
1. Spray the model with Army Painters Army Green. My can of this paint is fairly is for some reason fairly gritty, which I would avoid like the plague normally but actually works to your advantage when painting armour like this as it gives a little bit of texture.
2. Wash the entire model with Army Painters Strong Tone ink. This gives a nice brown/green base colour to start working up from.
3. Drybrush the main hull with Vallejo Model Colour Luftwaffe Camo Green (not Russian Green as you might be inclined to think). Don't be afraid to go at it pretty roughly at this step to bring that nice deep green colour to the model. I chose to do some things, like magazines and fuel barrels, using Russian Green instead to get a slight difference in nuance.
4. Add a bit of Vallejo Game Colour Sunblast Yellow to the Luftwaffe Camo and go at it again. Concentrate more on raised areas and corners this time around, but don't neglect flat open areas entirely.
5. Change the Yellow to Bonewhite and drybrush concentrating almost entirely on sharp edges. This will be the final drybrush so should be fairly light and really only hit the edges.
6. Paint any metal areas. I do mine with Vallejos Natural Steel that then get a black wash and some detailing picked out with silver.
7. Apply decals. I got a sheet of SSU decals from Dust Models that I applied using Micro Set and Micro Sol to make the decal itself more pliable. After it's all well and dry a quick slab of Vallejo Matt Varnish makes it become one with the background (don't forget to shake the bottle! And thin it with water).
8. Chipping! I love this part, it's so much fun! Take out that bottle of liquid magic that is Vallejo Model Colours German Grey and put some of it on your pallete. Then take a bit of foam, like from the back of a blister back, and cut out a small, easily handled piece. Then dip the piece in the German Grey and stipple some of it off on some paper, then get to work on the moddle. Use the sponge to stipple the very edges of the model, or areas where you would expect there to be a lot of wear and tear and worn off paint.
You can do as much or little as you can. Personally I prefer a fairly restrained approach so it doesn't look too beat up.
9. Rust. I use Vallejo Burnt Umber Pigment for my rust effects but there are many good pigments out there today. Simply dusting it on dry will make the vehicle simply appear... dusty so what you do is mix it with a little bit of water (you can use medical alcohol as well if you like, but I've never really noticed much difference) to get a nice almost wash-like rust that can easily be aplied to rivets etc. Try experimenting with the amount of water as it can give very varying results.
10. Drybrush some mud effects on the lower legs/tracks. I use a mix of Vallejo German Tankcrew (a lovely flat brown/grey/black colour) and Earth for this but it all depends on how you base your models.
11. Done! Probably. There might be some small details here and there that need painting but I'm sure you can figure those out yourself.
Sooo.... that's how I do it. Next up is probably a gun tractor (or two), a Nikita artillery walker and perhaps another tank. What? Infantry? Hah!
Talk to you later comrades!


Nice looking walkers and tanks! Looking forward to your coverage of Torchbearer and Dungeon World.
ReplyDeleteYou've done an excellent job on your Russians! :) By coincidence I've just now - in this hour past! - base-coated my IS-48. I'm doing a heavily-worn whitewash on my SSU stuff so the basecoat was a spray of Krylon Fusion White Satin. But after heavy green drybrushing it'll be great.
ReplyDeleteThanks guys! I really have a lot of fun with these Dust kits!
ReplyDelete@NetDiver - Should have the Torchbearer thoughts up by the weekend. Quick hint: I like it better than Dungeon World, perhaps because of the tighter structure.
@David - Haha! That's cool. I really like how the tanks helps to set the Russians apart from the other factions. Also, just heard we're getting jet fighters based on the Yak-23. Wee!
@Martin - I agree, I love the Russian tanks, and I weant to get the guntractors soon. I can't wait to see Russian jets. :)
ReplyDeleteGreat work tovarish! I'm working on my first DUST kit, the SSU Ground Attack Helicopter and I'm really enjoying it. I must pick up one of those KV-47s, I really like the look of it. The IS-48 isn't too bad either. I also really like the fact that the DUST kits are 1/48 scale, making it easier to supplement my forces with models from mainstream model manufacturers like Tamiya or Hobby Boss.
ReplyDeleteHello Joe! Thanks and welcome to the blog! I've been lazy painting my Dust stuff over the past six months so now I'm trying ti make it up by painting frantically for a couple of weeks. Actually I have another tanks (IS-5), a self propelled gun, an KV-47 Aero walker and a ground attack helicopter to post on the blog. I just need to get back hom from Prague first. Hehe!
ReplyDeleteOut of curiosity, how are you tackling your heli? I decided to give mine the classic khaki/green camo that you often see Hind helicopters use. At first I was not really happy with it, but it grew on me and now it's all good. :)
Indeed, having a specified scale to work with is really helpful. Although I think Paolo and the guys over at Dust Models stretch it a bit here and there it's a great guide and easy way find extra parts.